¶ 0. About
The Layout Editor is a fully functional GUI editor, modded into Minecraft, allowing you to edit menu screens like you would edit an image in the image editor of your choice.
It imitates its big editor siblings in many ways like shortcuts and menu design.
¶ 1. Where to find the Editor
You can find the Layout Editor in the Customization Helper menu bar.
¶ 2. Using the Editor
Using the Layout Editor is just as simple as using Paint!
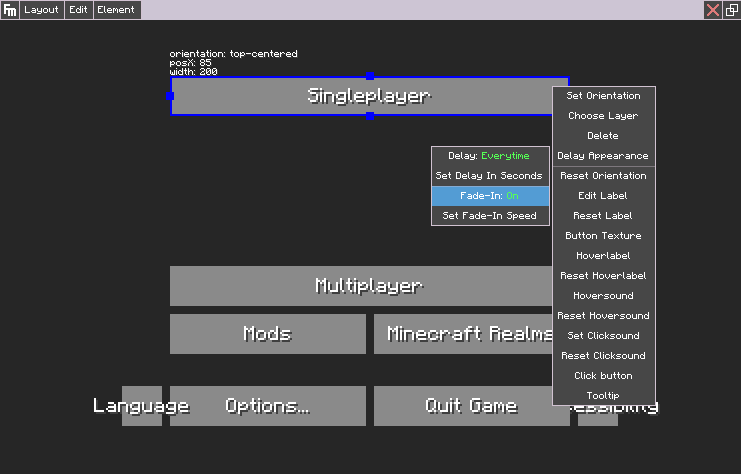
When you open the editor, you will see a menu containing (mostly) all buttons from the menu you want to edit, but don't worry, they're not real buttons, you can't accidentally click them and open another menu or something.
¶ 2.1. The Menu Bar
One of the most important menus in the Layout Editor is the menu bar at the top.

¶ 2.1.1. Layout
The Layout tab contains everything related to the current layout.
You can edit its properties, like changing the menu background or the GUI scale, and save it.
It can also be used to quickly switch between layouts without going back to the parent menu.

¶ 2.1.2. Edit
The Edit tab contains basic actions to manage your layout, like copy/paste elements or undo/redo actions!

¶ 2.1.3. Element
The Element tab contains everything related to what your layout contains - the layout elements.
You can add new elements to your layout here and manage audio elements and deleted vanilla buttons.

¶ 2.2. Layout Properties
You can find the layout properties by clicking on Layout -> Properties in the menu bar or by rightclicking the blank editor background.
This will open a context menu with settings to:
- Change the menu background (Background Options)
- Define if your layout should be rendered under vanilla menu elements or above them (Rendering Order)
- Set the GUI scale to force the menu to load with a specific scale (GUI Scale)
- Set the minimum and maximum needed screen size to load the layout (Windowsize Restricts)
- And much more!

¶ 2.3. Element Properties
Every element in your layout has its own properties. You can access these properties by rightclicking the element.
Not all types of elements have the same properties.

¶ 3. Element Orientations
Every element in your layout has an orientation.
By default, this is always the top-left orientation for all elements you've added to a layout and always the original orientation for vanilla (and mod) buttons that were already part of the menu.
You can change the orientation of an element by rightclicking it and clicking on Set Orientation.

Your element will then be moved to the origin point of your chosen orientation, which shows you from where the element's position will be calculated.
It depends on its orientation how an element will act when resizing the window. You can easily test this by resizing the editor window.
For a more in-detail description about how orientations work and how to choose the correct one, please take a look at the Element Orientations page.
¶ 4. Handling Stacked Elements
Sometimes, multiple elements will be on the same position, making it impossible to reach the one at the bottom.
Every element in the editor has its own "height level", let's call it "layer".
You will not really recognize this until you need it.
By rightclicking an element stack and clicking on the Choose Layer button, you will be able to choose between every element at the position of your mouse.

¶ 5. Shortcuts
The Layout Editor has some very useful and well known shortcuts to quickly navigate through it.
¶ 5.1. CTRL + Z
This shortcut will undo the last thing you've changed in the layout.
¶ 5.2. CTRL + Y
This shortcut will redo the last step if you've previously used the CTRL + ALT + Z shortcut.
¶ 5.3. CTRL + S
This one will save your layout.
¶ 5.4. CTRL + C
Pressing this shortcut will copy the selected elements.
¶ 5.5. CTRL + V
This shortcut will paste copied elements to the layout. This can also be used to copy elements to a new layout.
¶ 5.6. DEL
When an object is focused, you can press DEL to quickly delete the object.
¶ 5.7. Arrow Keys
You can move focused objects by using the arrow keys.
¶ 5.8. SHIFT-Click
When pressing SHIFT while resizing an object, it will be resized by its aspect ratio.
¶ 5.9. CTRL-Click on Elements
Pressing CTRL while clicking on elements will allow you to select multiple elements at once (group select), to move them all together by using the arrow keys or changing their properties by rightclicking them.
¶ 5.10. CTRL + G
Toggle a grid that helps you aligning elements.